Why a self-hosted VS Code server?
As an embedded software developer, I work from several places: at my desk at home, on the laptop, sometimes even just from a tablet. An IDE that’s configured identically everywhere, carries the same extensions, and sits right on the project — that’s not a luxury, that’s efficiency.
Cloud solutions like GitHub Codespaces or Gitpod solve the problem in
principle, but they bring dependencies and ongoing costs with them. My
approach is different: a small Debian system on the home network (or a VPS),
Podman without root privileges on top of it, and code-server as a
container. Management happens via Cockpit — the lightweight, web-based
system management tool that Debian has shipped almost out of the box since
version 12.
The concept at a glance
Browser (anywhere) → HTTPS:8080 → code-server container (Podman, rootless)
                                              ↓
                                   ~/code-server/projects/ (host)

Browser (local) → HTTPS:9090 → Cockpit (system management + Podman UI)
The stack consists of 3 core components:
Debian 12 Bookworm Minimal — a lean base, no graphical overhead
Cockpit — web-based server management including Podman integration
code-server — VS Code as a web app, running rootless inside the Podman container
Claude Code — an AI assistant right in the terminal, inside code-server
Prerequisites
Before getting started, the following should be in place:
A Debian 12 (Bookworm) Minimal installation — physical, as a VM, or as a VPS
Root access or
sudoprivilegesInternet access on the server
At least 2 GB of RAM and 10 GB of free storage
The stack is deliberately lightweight. It runs on my BeagleBone test setup, it runs on a Raspberry Pi 4, and it certainly runs on a small Proxmox node.
Base installation: preparing Debian Minimal
After a fresh minimal installation, update the system and install the most essential packages:
# Update the system
apt update && apt upgrade -y

# Basic tools
apt install -y sudo curl wget gnupg2 ca-certificates \
    apt-transport-https software-properties-common
If no regular user exists yet, create one and grant it sudo privileges:
useradd -m -s /bin/bash <UserName>
passwd <UserName>
usermod -aG sudo <UserName>
Replace |
All further steps are carried out as a regular user (not root), unless explicitly stated otherwise. This matters especially for Podman, since rootless containers are one of its core advantages over Docker. |
Cockpit: server management via the browser
Cockpit is a web-based admin interface that runs directly on the server. No
extra management server, no database — Cockpit talks directly to systemd,
NetworkManager, and of course Podman.
Installation
# Install Cockpit
apt install -y cockpit

# Enable and start the service
systemctl enable --now cockpit.socket

# If UFW is active: open the port
ufw allow 9090/tcp
First access
https://<SERVER-IP>:9090On first access, a certificate warning appears (self-signed certificate). Confirm it once, then log in with the Linux username and password.
Cockpit then shows an overview of CPU, RAM, network, and running services. Clear, compact, no frills.
Adding Podman integration
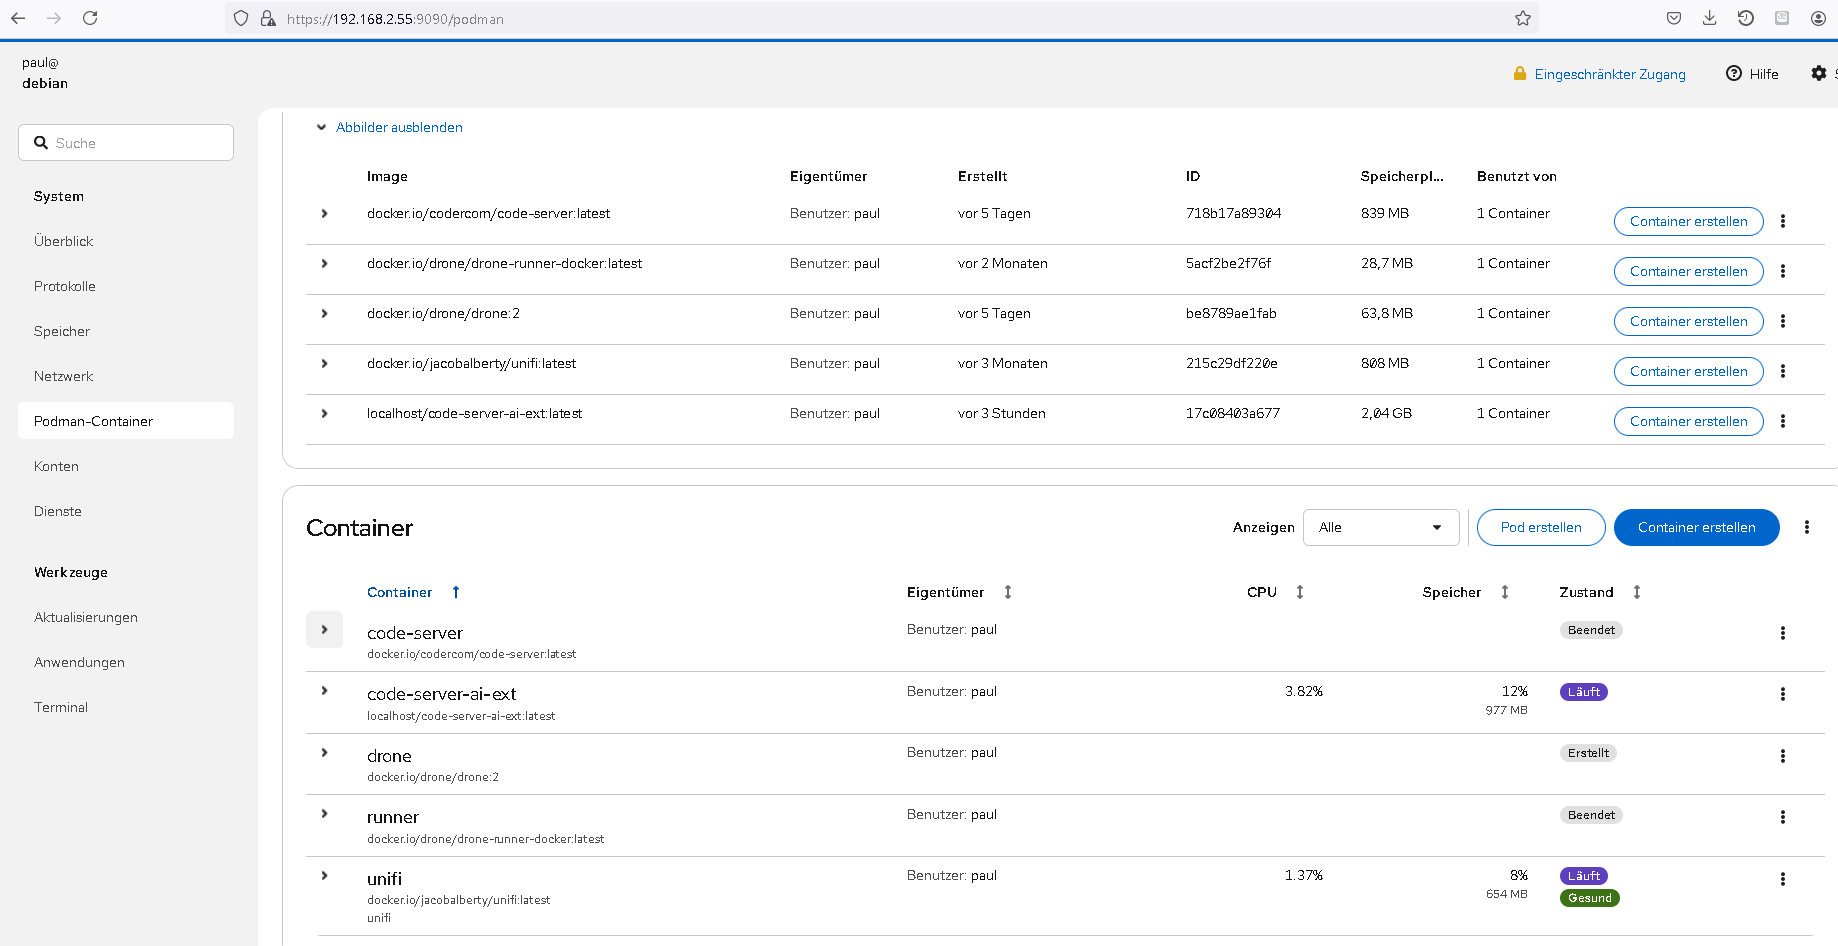
apt install -y cockpit-podmanAfter installation, a "Podman containers" entry appears in the left-hand menu. From there, containers can be started and stopped, logs viewed, and volumes managed graphically — all without a terminal.
Podman: rootless containers without a daemon
Podman is the daemonless alternative to Docker. The decisive advantage in a home server context: containers run under your own user account, without root privileges and without a permanent system daemon.
Installation and activation
# Install Podman
apt install -y podman

# Check the version
podman --version

# Enable the user socket (for rootless operation)
systemctl --user enable --now podman.socket
The user socket at |
Why Podman instead of Docker?
| Docker | Podman |
|---|---|
Requires a root daemon ( | No daemon, fully rootless |
Containers run as root by default | Containers run as the user |
Docker socket = security risk | No root-level socket needed |
Systemd integration is complex | Native |
Docker Compose required | Pods built in as a concept |
For a home server that also holds production data of mine, this isn’t an academic distinction — it’s a real security argument.
code-server: VS Code in the browser
code-server is Coder’s open-source project that ships VS Code as a web
server. The official Docker container works 1:1 with Podman.
Creating the directories
# As a regular user (not root)
mkdir -p ~/code-server/config
mkdir -p ~/code-server/projects
The projects directory on the host is mounted into the container. All
project data therefore lives on the host, and restarting the container
doesn’t change any of it.
Starting the container
podman run -d \
  --name code-server \
  -p 8080:8080 \
  -e PASSWORD=myPassword \
  -u $(id -u):$(id -g) \
  -v ~/code-server/config:/home/coder/.config/code-server:Z \
  -v ~/code-server/projects:/home/coder/project:Z \
  docker.io/codercom/code-server:latest
Parameters explained
| Parameter | Meaning |
|---|---|
| Start the container in the background (detached) |
| Unique container name for later commands |
| Port forwarding host:container |
| Login password for the VS Code web UI |
| Container runs as the current user — important for file permissions |
| Volume mount with SELinux relabeling ( |
Opening VS Code
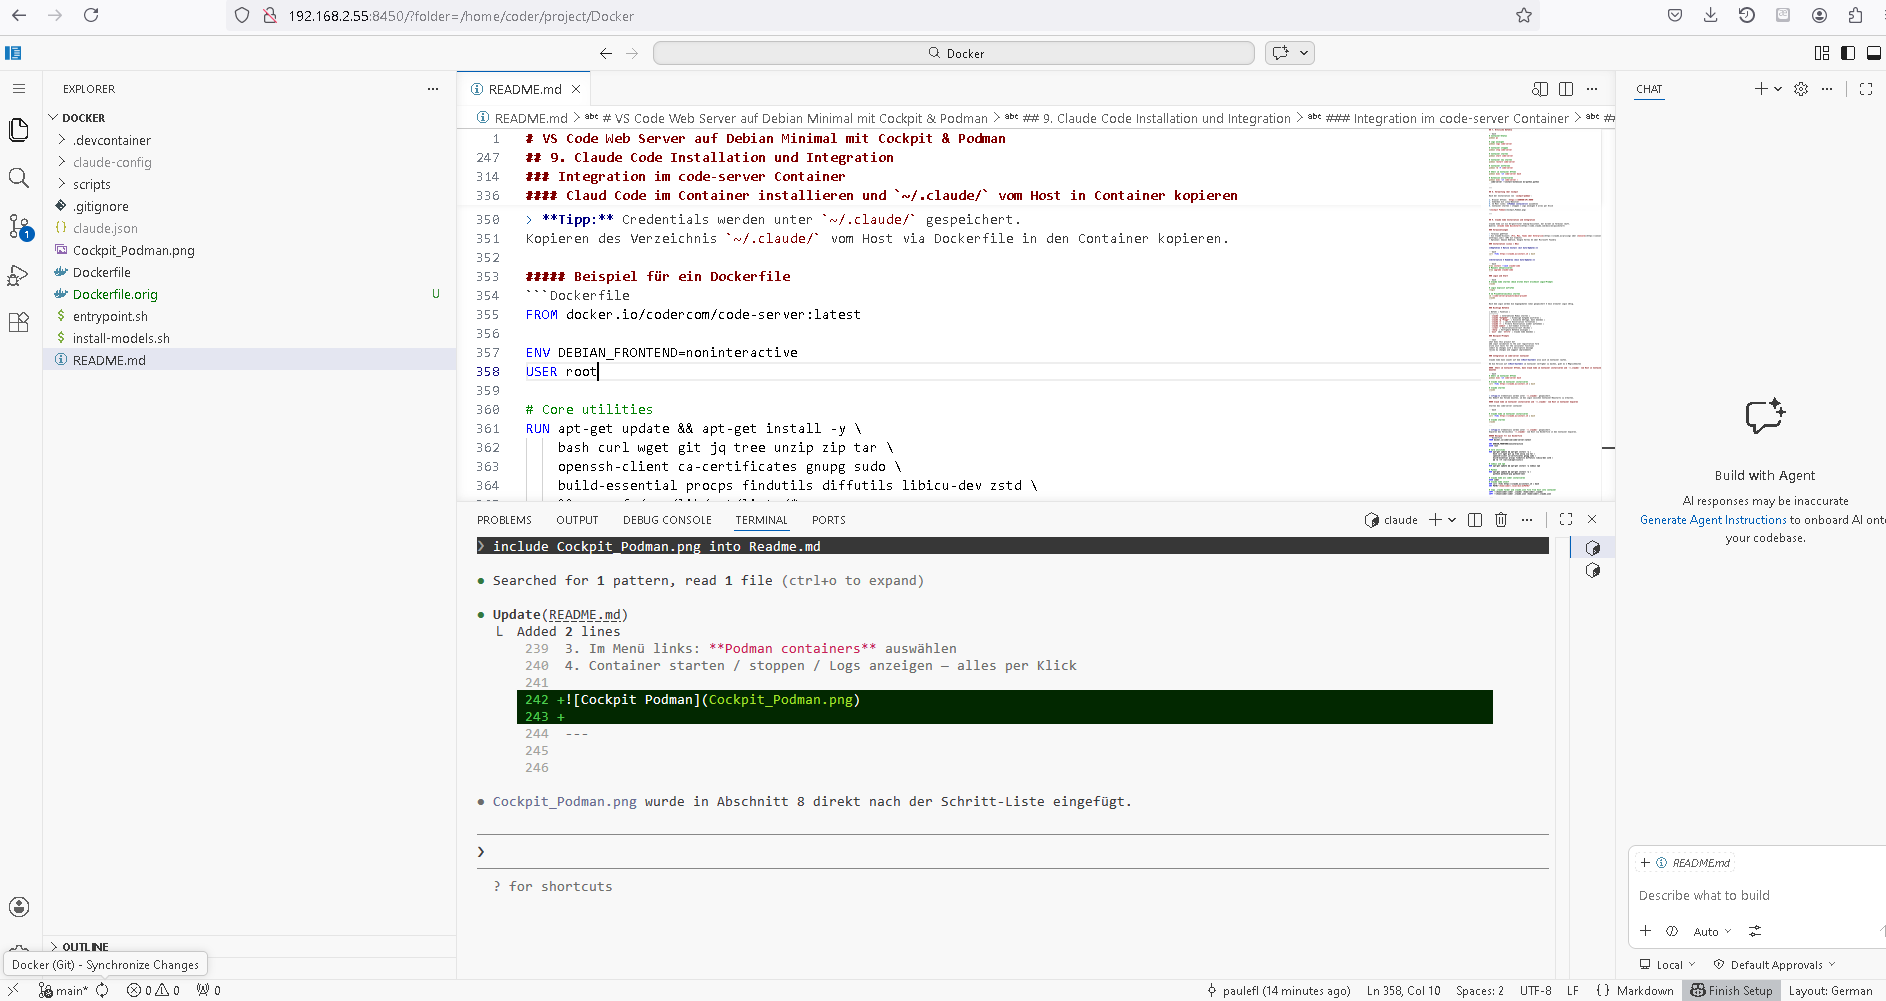
http://<SERVER-IP>:8080Enter the password and that’s it. VS Code runs in the browser, fully functional including terminal, Git integration, and extension support.
Autostart via systemd
A container that has to be started manually after every reboot isn’t a
production container. Podman ships with a generator for systemd units:
# Generate the unit file (in the current directory)
podman generate systemd --name code-server --files --new

# Move it into the user systemd folder
mkdir -p ~/.config/systemd/user/
mv container-code-server.service ~/.config/systemd/user/

# Enable and start the service
systemctl --user enable container-code-server.service
systemctl --user start container-code-server.service

# Enable lingering: user services keep running without an active session
loginctl enable-linger $(whoami)
|
HTTPS: without TLS, features are missing
Some VS Code features — the Markdown preview among them — only work over HTTPS. For internal use, a self-signed certificate is sufficient.
Creating the certificate
mkdir -p ~/code-server/certs

openssl req -x509 -nodes -days 365 -newkey rsa:2048 \
  -keyout ~/code-server/certs/cert.key \
  -out ~/code-server/certs/cert.crt \
  -subj "/CN=$(hostname -I | awk '{print $1}')" \
  -addext "subjectAltName=IP:$(hostname -I | awk '{print $1}'),IP:127.0.0.1"
Creating the configuration file
cat > ~/code-server/config/config.yaml << EOF
bind-addr: 0.0.0.0:8080
auth: password
password: myPassword
cert: /home/coder/.config/code-server/certs/cert.crt
cert-key: /home/coder/.config/code-server/certs/cert.key
EOF
Restarting the container with TLS
# Remove the old container
podman rm -f code-server

# Restart with the certificate volume
podman run -d \
  --name code-server \
  -p 8080:8080 \
  -e PASSWORD=myPassword \
  -u $(id -u):$(id -g) \
  -v ~/code-server/config:/home/coder/.config/code-server:Z \
  -v ~/code-server/projects:/home/coder/project:Z \
  -v ~/code-server/certs:/home/coder/.config/code-server/certs:Z \
  docker.io/codercom/code-server:latest
Access it afterwards via:
https://<SERVER-IP>:8080Confirm the certificate warning once, and after that everything runs smoothly.
Claude Code: an AI assistant right in the terminal
Claude Code is a terminal-based AI coding assistant from Anthropic. It runs directly in code-server’s integrated terminal — no browser plugin, no cloud IDE lock-in, and no other workaround is needed.
Prerequisites
An Anthropic account: Pro, Max, Teams, Enterprise, or API access via the Console
Optional: Amazon Bedrock, Google Vertex AI, or Microsoft Foundry as a backend
Installing it on the host or inside the container
# Recommended: native install with auto-update
curl -fsSL https://claude.ai/install.sh | bash
Alternatively via Homebrew (no automatic updates):
brew install --cask claude-codeFirst launch and login
# Start it inside the project directory
cd ~/code-server/projects/my-project
claude
A login prompt appears on first launch. After a one-time authentication,
the credentials are stored under ~/.claude/, and no further login is
required.
Important commands
| Command | Function |
|---|---|
| Start interactive mode |
| Run a one-off task directly |
| Single query, then exit (pipe-friendly) |
| Continue the last conversation |
| Resume a previous conversation |
| Automatically create a Git commit with a meaningful message |
| Clear the conversation history |
| Show all available slash commands |
| Quit Claude Code |
Real-world examples
# Understand the project
what does this project do?

# Add input validation
add input validation to the user registration form

# Have tests written
write unit tests for the calculator functions

# Create a commit
commit my changes with a descriptive message

# Code review
review my changes and suggest improvements
Integration: Claude Code inside the container
Claude Code can run either on the host or directly inside the code-server container. For seamless integration inside the container, there are two approaches:
Variant A: installing directly inside the container
# Open a shell inside the container
podman exec -it code-server bash

# Install Claude Code inside the container
curl -fsSL https://claude.ai/install.sh | bash

# Start Claude
claude
Credentials end up under |
Variant B: embedding credentials via a Dockerfile
For a reproducible, version-controlled environment, I recommend a custom container:
FROM docker.io/codercom/code-server:latest

ENV DEBIAN_FRONTEND=noninteractive
USER root

# Base packages
RUN apt-get update && apt-get install -y \
    bash curl wget git jq tree unzip zip tar \
    openssh-client ca-certificates gnupg sudo \
    build-essential procps findutils diffutils \
    libicu-dev zstd \
    && rm -rf /var/lib/apt/lists/*

# Node.js and Python
RUN apt-get update && apt-get install -y nodejs npm python3 \
    python3-pip python3-venv

# Install Claude Code as the 'coder' user
USER coder
RUN curl -fsSL https://claude.ai/install.sh | bash
ENV PATH="/home/coder/.local/bin:${PATH}"

# Copy credentials from the host into the container
COPY --chown=coder:coder .claude/ /home/coder/.claude/
COPY --chown=coder:coder .claude.json /home/coder/.claude.json
The credential files ( |
Handy everyday commands
Container management
# Status of all containers
podman ps

# Follow logs live
podman logs -f code-server

# Stop / start / restart the container
podman stop code-server
podman start code-server
podman restart code-server

# Remove the container completely (data on host volumes is preserved)
podman rm -f code-server

# Open a shell inside the container
podman exec -it code-server bash

# Install a VS Code extension
podman exec -it code-server \
  code-server --install-extension ms-python.python
Management via Cockpit
For anyone who’d rather avoid the terminal: once cockpit-podman is
installed, Cockpit offers a complete graphical interface.
Open the browser:
https://<SERVER-IP>:9090Log in with the Linux user
In the left-hand menu: select "Podman containers"
Start containers, stop them, read logs — all with a click
Summary and quick reference
| Component | URL / command |
|---|---|
Cockpit web UI | |
VS Code web UI | |
Change the password |
|
Projects (host path) |
|
Install an extension |
|
Start Claude Code |
|
Conclusion
The stack is compact, secure, and can run entirely without any cloud dependency. What convinced me most personally:
Rootless Podman eliminates an entire class of security risks
Cockpit makes the server manageable even without a permanent SSH terminal
Systemd lingering ensures reliable autostart without root configuration
Claude Code in the terminal is more efficient than any browser plugin — it sees the code, the project context, and the Git repository directly
The complete repository with all configuration files: * https://github.com/paul-fleischmann-com/selfhosted-vscode-stack