This post is part of the series about my personal BeagleBone Black project. The series has already covered the Yocto build (meta-layer & BSP), a kernel module of its own, and cross-compilation — but not what typically goes wrong the first time your own image, your own hardware extension (cape), and kernel configuration all interact. That exact boundary between "board doesn’t boot" and "software misconfigured" is, in my experience, the most frustrating part of an embedded project.
Understanding the boot sequence
Before you can narrow down a fault, you need to be clear on what happens, and in what order:
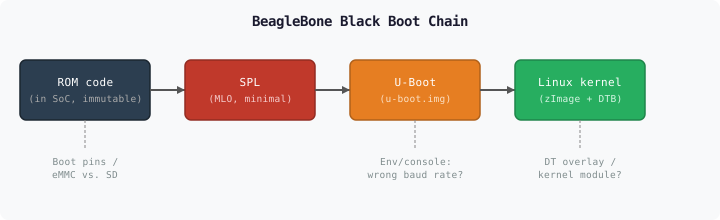
| Stage | Task |
|---|---|
ROM code | Hardwired into the SoC, immutable. Reads the boot pins (SYSBOOT), decides: eMMC or SD card |
SPL ( | Minimal first-stage bootloader — initializes only what’s strictly necessary (DDR RAM, clocks), loads U-Boot |
U-Boot ( | Full bootloader — loads the kernel image and device-tree blob, passes the kernel command line |
Linux kernel |
|
The boot pins (three resistors on the board, or an equivalent SW strap) decide whether boot happens from eMMC or SD. A common first mistake with your own boards/capes: a boot-pin line gets accidentally claimed by your own cape, silently changing the boot order without it being obvious right away. |
No sign of life over the UART console
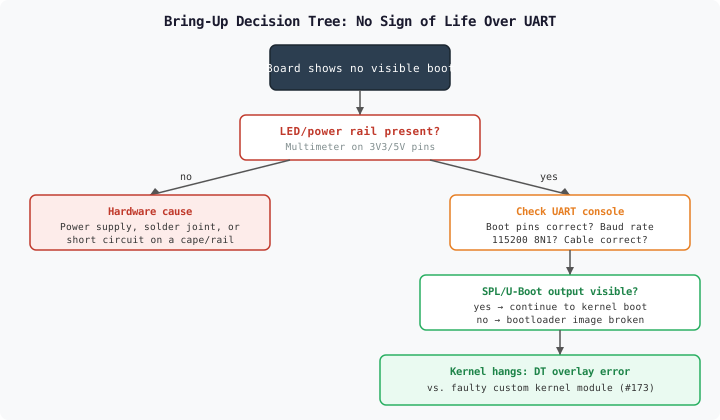
The systematic narrowing path once the UART console (default: 115200 8N1) stays silent:
Check the power rail — multimeter on the 3V3 and 5V test points. No signal here means a hardware cause (power supply, solder joint, a short caused by your own cape) — before software even enters the picture.
Check boot pins / baud rate — power is present but the console stays silent: the wrong baud rate is the most common beginner mistake, closely followed by a miswired UART-to-USB adapter (RX/TX swapped).
Is SPL/U-Boot output visible? — if yes, the hardware side is fundamentally fine; the problem lies in the bootloader image or afterward.
Kernel hangs after U-Boot — this is where it gets interesting, see the next section.
Running a UART-to-USB adapter at 5V logic level instead of 3V3 on the BeagleBone’s debug pins can damage the UART transceiver pins. Check your own adapter’s logic level before connecting it the first time — this mistake doesn’t show up immediately, but often only as sporadically flickering/corrupted console output weeks later. |
Board boots, but the kernel hangs
If U-Boot completes cleanly but nothing else appears on the console afterward, there are two fundamentally different failure classes — distinguishable only through targeted investigation:
| Symptom | Device-tree overlay error | Faulty own kernel module |
|---|---|---|
When it occurs | Immediately at kernel start, before any user space | Usually only after user space starts, at |
Typical cause | Overlay references a nonexistent pin/wrong address, overlay isn’t loaded at all (missing | NULL-pointer access, double |
Narrowing down |
|
|
The most pragmatic first step for "kernel hangs": temporarily roll your own kernel configuration back to a known reference image (the official BeagleBone Debian image). If the reference image boots cleanly, the fault is very likely in your own Yocto configuration or your own kernel module, not in the hardware itself. |
Own cape not detected
A custom hardware extension board (cape) that isn’t detected usually has one of two causes in practice:
I2C EEPROM ID problem — every official cape carries an I2C EEPROM with a unique ID that the BeagleBone reads at boot to automatically load the matching device-tree overlays. A custom cape without a (correctly written) EEPROM simply isn’t auto-detected — that’s expected behavior, not a bug, without a manual overlay load.
Device-tree overlay not loaded — even with a correct EEPROM, the overlay entry in
uEnv.txtcan be missing or misnamed. Diagnosis:cat /proc/device-tree/chosen/overlays(or the equivalent capemgr interface, depending on kernel version) shows which overlays were actually loaded.
For your own development, manually forcing an overlay load via |
Systematic narrowing
The common thread running through all the cases above is the same: check from the outside in before suspecting the software stack.
| Step | Tool |
|---|---|
1. Power rail | Multimeter |
2. Boot signal | UART console (correct baud rate/logic level) |
3. Bootloader progress | SPL/U-Boot output on the console |
4. Kernel/driver level |
|
This order isn’t a BeagleBone specialty — it’s the general bring-up methodology, from multimeter to protocol analyzer, applied here to a real project.
Summary
| Symptom | First suspect |
|---|---|
No sign of life over UART | Check the power rail with a multimeter before suspecting the software |
SPL/U-Boot missing on the console | Boot pins/baud rate/cable — the wrong baud rate is the most common beginner mistake |
Kernel hangs after U-Boot |
|
Own cape not detected | Missing/wrong I2C EEPROM ID vs. missing |