This post continues from the first part. That covered what Architecture-as-Code is and what sets Bausteinsicht apart from other tools. Here it gets practical: installation, first project, first diagram.
Prerequisites
Bausteinsicht binary (Linux, macOS, or Windows)
draw.io Desktop or the draw.io VS Code extension
An editor with JSON support (VS Code recommended)
Installation
# Automatically determine the latest version (Linux amd64)
VER=$(curl -s https://api.github.com/repos/docToolchain/Bausteinsicht/releases/latest \
      | grep '"tag_name"' | cut -d'"' -f4 | sed 's/^v//')
curl -Lo bausteinsicht.tar.gz \
  "https://github.com/docToolchain/Bausteinsicht/releases/download/v${VER}/Bausteinsicht_${VER}_linux_amd64.tar.gz"
tar xzf bausteinsicht.tar.gz && sudo mv bausteinsicht /usr/local/bin/

# macOS (Apple Silicon)
curl -Lo bausteinsicht.tar.gz \
  "https://github.com/docToolchain/Bausteinsicht/releases/download/v${VER}/Bausteinsicht_${VER}_darwin_arm64.tar.gz"
tar xzf bausteinsicht.tar.gz && sudo mv bausteinsicht /usr/local/bin/

# Go Install (all platforms — always the latest version)
go install github.com/docToolchain/Bausteinsicht/cmd/bausteinsicht@latest
Check that the installation works:
bausteinsicht --versionStep 1: Initialize a Project
Create a new folder and initialize Bausteinsicht:
mkdir my-architecture && cd my-architecture
bausteinsicht init
init creates four files:
| File | Purpose |
|---|---|
| The architecture model — the single source of truth |
| The generated draw.io diagram |
| Visual styles for element types (colors, shapes) |
| Sync state file — belongs in git alongside the model |
Step 2: Understanding the Generated Model
Bausteinsicht creates an example model of an online shop.
Open architecture.jsonc in your editor — you will see the three main sections:
{
  "specification": {
    "elements": {
      "actor":     { "notation": "Actor" },
      "system":    { "notation": "Software System", "container": true },
      "container": { "notation": "Container", "container": true },
      "component": { "notation": "Component", "container": true }
    },
    "relationships": {
      "uses":  { "notation": "uses" },
      "reads": { "notation": "reads", "dashed": true }
    }
  },

  "model": {
    "customer": { "kind": "actor", "title": "Customer" },
    "onlineshop": {
      "kind": "system", "title": "Online Shop",
      "children": {
        "frontend": { "kind": "container", "title": "Web Frontend",  "technology": "React" },
        "api":      { "kind": "container", "title": "REST API",       "technology": "Go"    },
        "db":       { "kind": "container", "title": "Database",       "technology": "PostgreSQL" }
      }
    }
  },

  "views": {
    "context":    { "title": "System Context", "include": ["customer", "onlineshop"] },
    "containers": { "title": "Container View", "scope": "onlineshop",
                    "include": ["customer", "onlineshop.*"] }
  }
}
specification defines the language of the model.
model describes the concrete system.
views controls which elements appear in which diagram.
Validate the model:
bausteinsicht validateOutput: Model is valid.
Step 3: Open the Diagram
Open architecture.drawio in draw.io.
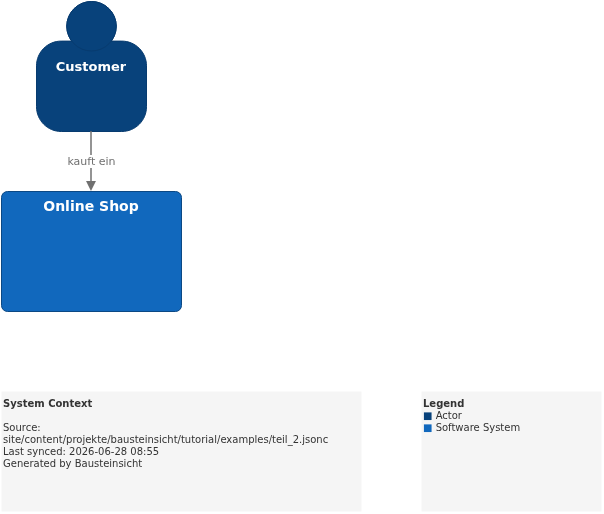
You will see two tabs:
System Context — Customer and Online Shop at the top level
Container View — the internal containers of the Online Shop
New elements appear with a red dashed border as a visual marker. Positions can be adjusted by drag and drop — Bausteinsicht remembers the set positions on the next synchronization.
The layout is intentionally manual — and that is a feature, not a limitation.
Bausteinsicht does not apply positions automatically, because no algorithm knows
which spatial proximity carries meaning in your diagram.
You decide which elements belong together and how the reading direction flows.
Once set, positions are preserved on every sync — you never have to re-layout,
as long as you do not add new elements.
For those who still want automatic arrangement, bausteinsicht sync --relayout is available —
it resets all positions and applies the hierarchical auto-layout.
Details in Part 14: Auto-Layout. |
Step 4: Add an Element via CLI
Add a new email service to the model:
bausteinsicht add element \
  --id emailservice \
  --kind container \
  --title "Email Service" \
  --technology "Go" \
  --parent onlineshop \
  --description "Sends transactional emails"
Output: Added element 'onlineshop.emailservice' (kind: container) to model.
Now create a relationship from the REST API to the Email Service:
bausteinsicht add relationship \
  --from onlineshop.api \
  --to onlineshop.emailservice \
  --label "sends emails" \
  --kind uses
Step 5: Sync Model → Diagram
bausteinsicht syncOutput:
Forward (model → draw.io): 2 added, 0 updated, 0 deleted
Reload architecture.drawio in draw.io — the Email Service appears with a red border in the Container View.
Step 6: Sync Diagram → Model
Now the other direction: write a change from the diagram back into the model.
Open
architecture.drawioin draw.ioDouble-click on "Web Frontend"
Change the title to "Web App"
Save the file
bausteinsicht syncOutput:
Reverse (draw.io → model): 0 added, 1 updated, 0 deleted
Open architecture.jsonc — the title has been updated to "Web App".
That is bidirectional synchronization in practice.
Step 7: Watch Mode
For continuous synchronization while working:
bausteinsicht watchBausteinsicht monitors both files and syncs automatically on every change.
This allows you to work in the editor and in draw.io simultaneously — without manual sync.
Ctrl+C exits watch mode.
watch works well for workshops and review sessions: multiple people can edit the model and diagram simultaneously, and the watch process keeps everything in sync. |
Example Model
The example for this part is stored as a runnable JSONC file at teil_2.jsonc.
This is what the result looks like in draw.io (bausteinsicht sync):
The draw.io file for this can be found here: teil_2.drawio
Generated PNG files via bausteinsicht export --image-format png:
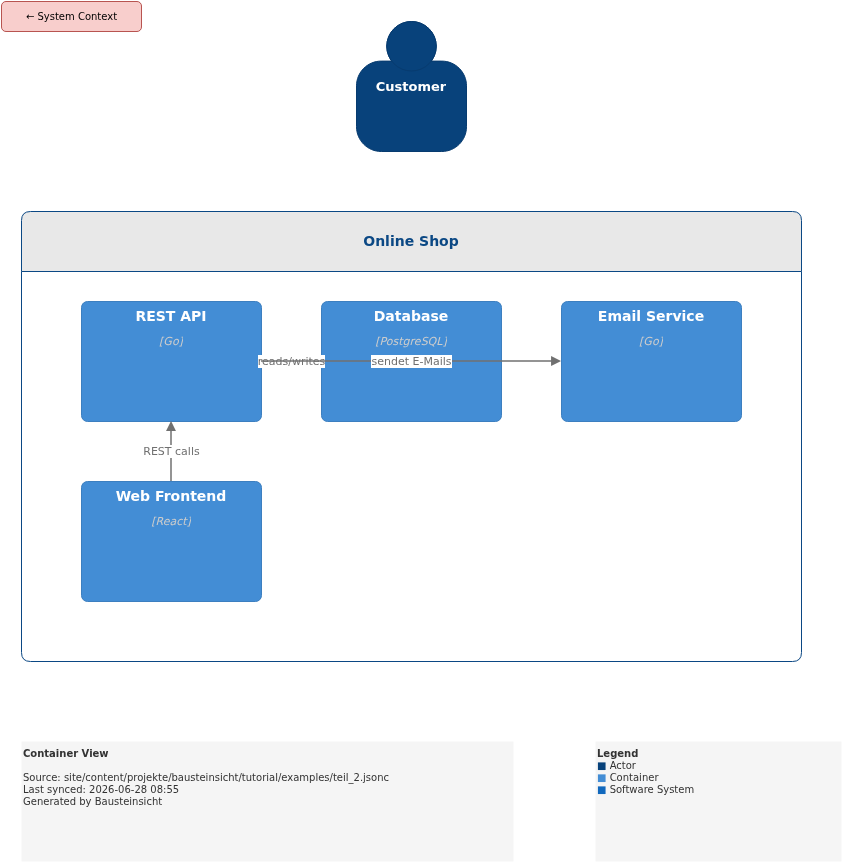
Generated PlantUML diagrams via bausteinsicht export-diagram:
What Comes Next
Part 3: The Data Model in Detail — specification, model, views and all available fields
Part 4: Bidirectional Synchronization — how the merge algorithm works and what happens when both sides were changed simultaneously
Official documentation: User Manual · Tutorial on doctoolchain.org